Workspace Setup
What Is Coder?
Coder is a cloud-based development environment that runs entirely in your browser. You open a URL and everything is ready. No installation needed.
What is a development environment?
A development environment is a set of tools that let developers write code, run programs, manage files, and test their work. Setting one up normally takes hours: installing the right versions of programming languages, downloading libraries, configuring settings, troubleshooting compatibility issues. It's tedious even for experienced engineers. Coder eliminates all of that. Think of it as a pre-configured laptop in the cloud, already set up by someone who knew exactly what you'd need.
Getting In
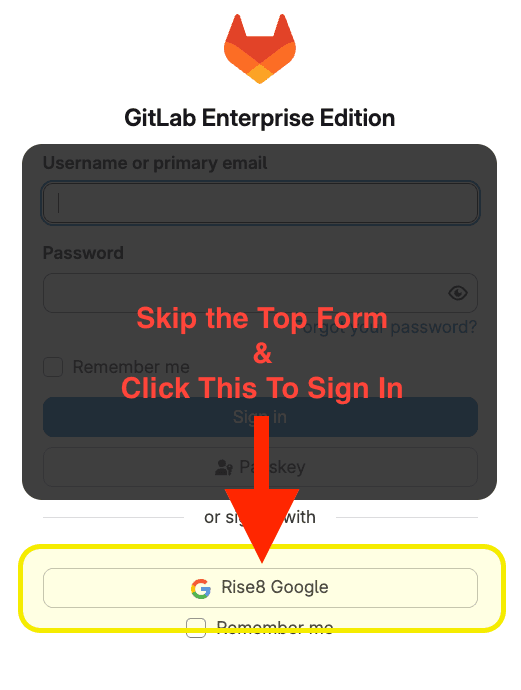
- Open {{{{ VARIABLE WORKSPACE_URL }}}} in your browser
- Sign In with Google
- A Google sign-in window will appear. Choose or log into the Google account you brought for the event
- You will need to authorize a Google sign-in for Coder
- Once you're signed in, you'll land on the Workspaces dashboard
This is your home base in Coder. From here, you'll create your workspace.
Creating Your Workspace
- From the Workspaces dashboard, click the New workspace button in the top right.
- Select Impact Lab App template to get started (it may be labeled as impactlab-app).
-
From the New workspace page fill out the form:
- Workspace name: Type any name you like, or click the small generated name link below the field to pre-populate a random one. This should be completely unique to you as an individual.
-
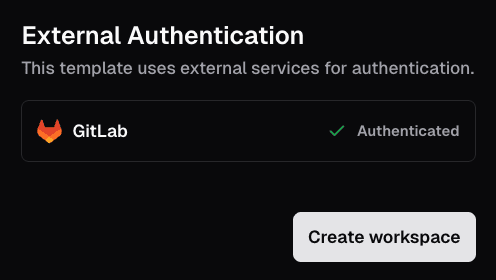
GitLab: Click the button to connect to GitLab.
- When GitLab's login page appears, choose the Google sign-in option and use the same Google account you just used to sign into Coder.
- Click Authorize Coder External Auth on the confirmation screen to allow Coder to connect to your GitLab account.
- If you see a green check mark and it says "Authenticated," you're good.
GitLab Connection Troubleshooting
Authorization with GitLab via your Google Account only happens once.
If something goes wrong or you see an error, refresh the page and try the "Login with GitLab" step again.
- When GitLab's login page appears, choose the Google sign-in option and use the same Google account you just used to sign into Coder.
-
Once everything looks good, click Create workspace.
- You'll see a progress bar and some logging output as your workspace is being built. This takes about a minute. Just sit tight and let it run.
- When it finishes, you should see a green light that says Running in the upper right corner. Status checks should indicate that things are working properly.
Your workspace is ready!
Workspace Orientation
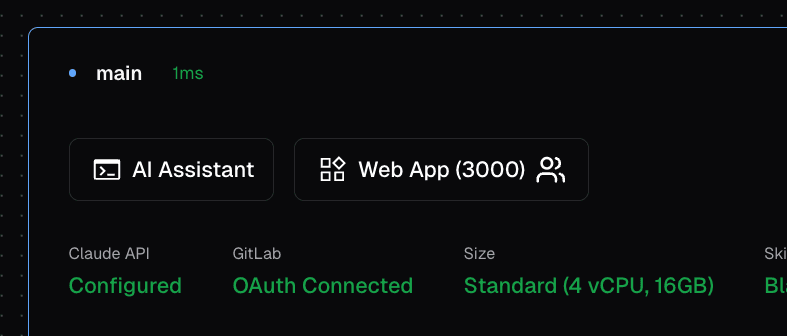
Your Two Buttons
- AI Assistant: opens a session with your AI coding assistant already running.
- This is where you'll do all of your building. You talk to your assistant here in plain English, and it builds your application on your behalf.
- Web App: opens a live preview of the application your assistant is building.
- As your assistant makes changes, this view updates in real time so you can see the results.
That's it. Two buttons: one to talk to your AI assistant, one to see what it's building.
First time in the AI Assistant
Click the AI Assistant button to open your AI coding assistant. The first time you launch it, the assistant will walk you through a few setup questions. Here's what to expect:
- Theme: It may ask if you want light or dark mode. Pick whichever you prefer.
- Security Notice: Acknowledge that your AI Assistant can make mistakes. In this lab, we have put guardrails around what your AI Assistant can do to limit costly mistakes.
- Accessing Workspace: Say "Yes I trust this folder"
-
Bypass Permission mode. You'll see a screen asking how much autonomy to give the assistant. Select "Yes, I accept" by pressing the down arrow key once, then pressing Enter.
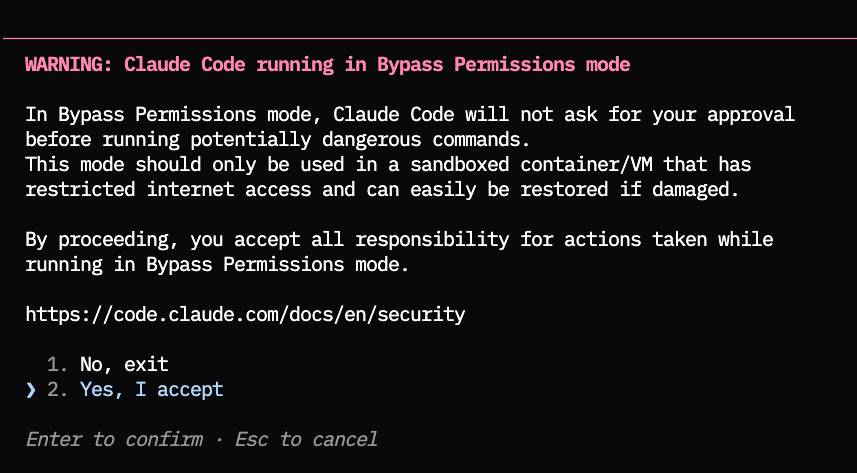
Giving your assistant permission to work independently: is it safe?
The "Bypass Permission mode" setting lets your AI assistant make changes to files, run commands, and install packages without asking you to approve each action individually.
For Impact Lab, this is our recommended setting. Your Coder workspace has guardrails that limit what the assistant can do, and working in this mode lets you focus on what you're building rather than managing the tool. Without it, the assistant will pause and ask permission before every action, which slows things down and, for those less familiar with the technical details, surfaces decisions that are hard to evaluate.
Outside of this lab environment, you may want to be more deliberate about how much autonomy you give an AI assistant. The right level depends on the environment, the sensitivity of the work, and how much you trust the guardrails around it.
To make sure everything is working, try asking your assistant:
What do I have here?
If the workspace is set up correctly, it will describe the environment and confirm you're ready to build. Your assistant may also ask for your name, role, and what you're working on during this first interaction. Answer naturally. It saves this to a file so it can address you by name and understand your context going forward.
New to the AI Assistant interface?
The AI Assistant runs in a text-based interface called a terminal. If you've never used one before, it might look unfamiliar: just text on a dark screen. That's normal. You type in plain English, and your assistant responds. No buttons, no menus, just conversation.
Here are a few things that will help:
- It's keyboard-driven. You type your message and press Enter to send it. Clicking with your mouse won't place your cursor in the text like it does in a document.
- Copy and paste. Select text with your mouse to copy, then paste where you're typing. On Mac, use Cmd+C and Cmd+V. On Windows, use Ctrl+C and Ctrl+V (or right-click to paste).
- Start over. If you're mid-sentence and want to clear what you've typed, press Ctrl+C (Mac and Windows) to cancel and get a fresh line.
- Scroll. Use your mouse wheel or trackpad to scroll up through earlier output. Scrolling doesn't move where you're typing.
- Arrow keys. Left and right arrows move within what you're currently typing. Up arrow recalls your last message.
That's all you need. If something feels unfamiliar, just keep typing and pressing Enter.
The Web App Preview
Click Web App to see your application running inside your development environment. This is a preview, running in your development environment. You and your team can see it. As you make changes, you can see them reflected here live.
Clicking this for the very first time, you should see the text "Hello World"
How does the preview compare to a production deployment?
The web app preview is different from a production deployment, which you'll do later in the field guide. A production deployment takes your application and puts it on a public URL that anyone can access from any browser. Production deployments are vetted for security and quality. The web app preview is your window into what your assistant is building in real time.
No File Browser (On Purpose)
There's no file explorer, no code editor, no way to browse or edit files directly. That's intentional. You'll work entirely through conversation with your AI assistant: ask it to explain what's in the project, tell it what to change, ask it where things are.
Why no file browser?
We're asking you to work through conversation rather than browsing and editing files directly. If you're someone who's used to working with files directly, this might feel uncomfortable at first. That's the point. This is an experiment in a different way of working, one where your AI assistant handles the files and you focus on describing what you want. It forces everyone to practice communicating with AI rather than falling back on manual editing. Give it a genuine try. You might be surprised how far you can get without ever opening a file.
Your Workspace and Your Team
Each team member gets their own workspace, but every workspace on your team connects to the same project on GitLab. Think of it like everyone having their own computer, but working on the same shared document. When you save and sync your work, your changes go to that shared project. Your teammates can then pull those changes into their own workspaces.
This means multiple people can work from different workspaces at the same time, but coordinating those changes gets complicated fast. For Beginner and Intermediate tracks especially, we recommend your team work together on one screen (called "mobbing"). One person drives, everyone else navigates. This keeps the whole team on the same version and avoids the headaches of merging conflicting changes.
What's Pre-Configured
Your workspace comes ready to go with everything your team needs to build, test, and deploy your application.
Your workspace runs on a Chainguard container image, a hardened, minimal base that's rebuilt nightly with zero known vulnerabilities. This means your development environment is secure by default, without your team needing to worry about patching or maintaining it.
Here's what's included:
- Your AI assistant: already running when you click AI Assistant, ready to build through conversation
- A web application framework: for building your application's pages, logic, and interface
- A database: for storing and retrieving data that persists across sessions
- Source control: tracks every change so you can undo mistakes and collaborate without overwriting each other's work
- A deployment pipeline: takes your code and makes it available as a live application at a public URL
Your Tech Stack
You don't need to know any of this to succeed in the Impact Lab. This is here for people with a technical background who are curious.
For those who want to know what's under the hood:
- Hono - your web framework. A lightweight, modern alternative to Express that handles HTTP requests, serves your frontend, and exposes API routes. It's what's running when you hit your web app preview.
- Bun - your runtime and package manager in one. It runs your TypeScript code with no compile step, installs dependencies (
bun install), and runs your tests. Like Node.js + npm, but significantly faster. - TypeScript - the language everything is written in. JavaScript with a type system, so errors get caught before your code runs rather than at runtime.
- Biome + ESLint - code formatting and linting that enforces consistent style and catches common mistakes automatically.
- PostgreSQL - your relational database. Starts automatically in your workspace for local development. A dedicated cloud database is provisioned for you in production on first deploy.
CI/CD Pipeline Stages
This is included for transparency. You don't need to understand any of this to succeed.
Your deployment pipeline runs on GitLab and triggers on every git push. It has two phases:
Build and deploy your app:
| Stage | What It Does |
|---|---|
| Lint | Checks code formatting and TypeScript types; zero warnings allowed |
| Test | Runs unit tests, static security analysis, secret detection, and dependency vulnerability scanning |
| Build | Packages your application into a deployable container image |
| Deploy | Deploys the container to AWS; your app goes live at its public URL |
Security and compliance (runs automatically, no action needed):
| Stage | What It Does |
|---|---|
| Scan | Scans the container image for vulnerabilities; generates a software bill of materials (SBOM) |
| STIG Check | CIS Docker Benchmark compliance check |
| Gatecheck | Policy evaluation; all prior security gates must pass before deployment proceeds |
| Sign | Cryptographically signs the container image for supply chain integrity |
| DAST | Runs a dynamic security scan against the live deployment |
| Evidence | Uploads security artifacts (SBOM, scan results, signatures) as a body of evidence |
You're Ready
If your assistant responded to "What do I have here?" and you can see the web app preview, you're all set.
If you're on Intermediate, Advanced, or Expert and your team finishes setup early, don't wait. Open your field guide and move straight into Lesson 1. The time you save here is extra build time in your first Challenge.
If you're on Beginner, check your event schedule for what comes next and follow your Facilitator's direction.